An Approach to Solving Technical Difficulties Facing Non-CS Students in a Database Class
Автор: Sukanya Suranauwarat
Журнал: International Journal of Modern Education and Computer Science (IJMECS) @ijmecs
Статья в выпуске: 2 vol.9, 2017 года.
Бесплатный доступ
Today, an organization's biggest asset is its data. Knowledge of relational databases and SQL (Structured Query Language) is one of the most valued technical skills and in high demand in most organizations. Students of any major can benefit in their careers from learning these fundamental database concepts. At our school, database classes for both CS (Computer Science) and non-CS students are offered by our computer science faculty members. Teaching database concepts can be challenging especially to non-CS students. In this paper, we discuss the technical difficulties our non-CS students experience in their database class and an approach to solving these problems.
Database Education, Entity Relationship Diagrams, Database Modeling Tool, SQL, Cloud IDE, Vagrant, NetBeans IDE
Короткий адрес: https://sciup.org/15014942
IDR: 15014942
Текст научной статьи An Approach to Solving Technical Difficulties Facing Non-CS Students in a Database Class
Published Online February 2017 in MECS DOI: 10.5815/ijmecs.2017.02.02
Databases are everywhere. They are crucial to modern organizations supporting both daily operations and decision making. Databases support daily operations through e-commerce such as product searching and product ordering. Databases support decision making such as resolving customer complaints, choosing suppliers, and deciding on locations for new stores. Since databases are so ubiquitous and important, students of any major can benefit in their careers from an introduction to database concepts. At our school, database classes for both CS (Computer Science) and non-CS students are offered by our computer science faculty members. Teaching the database class for non-CS students has been a challenge at our school.
As an aid to teaching database concepts, a few educational tools for learning database concepts have been developed. One example is WinRDBI [1], [2] that allows a student to interactively experiment with relational algebra, relational calculus, and SQL (Structured Query Language). Another example is ADbC (Animated Database Courseware) [3], [4] that interactively guides a student step by step through a particular database concept using hard-coded examples. ADbC covers a wide variety of database concepts including SQL, stored procedures and triggers, transactions, and database design. These educational tools are geared toward CS students. Since these tools are complex, instructors may need to present them in class first; then, have students experiment with them. Another example of a database educational tool is the animation tool developed at Arizona State University [5], [6]; it provides two animations with images and color that visually and dynamically present fundamental database concepts including the use of databases and SQL for storing and retrieving data. This tool is intended to introduce fundamental database concepts to students of any major.
While the above tools can be used as instructional aids to supplement classroom teaching, they are not a universal solution to the problems we face when offering a database course for non-CS students. For example, although the database design module of ADbC can be used to exemplify the different symbols used to construct entity relationship diagrams (ERDs), ADbC does not provide the ERD drawing tools. While our CS students manage to learn how to use Microsoft Visio, which is a powerful software with a steep learning curve, to draw their ERD assignments, our non-CS students end up drawing the ERDs by hand, which is tedious. Clearly, a drawing tool with a shallow learning curve is needed as an alternative for our non-CS students to have a better learning experience.
To learn SQL, students are required to install and configure an RDBMS (Relational Database Management System) manually on their machines. Our non-CS students often need extra time and more help from the instructors to accomplish this task. Oftentimes we need to troubleshoot which software, services, dependencies, or configurations on their machines cause the installation process to fail or prevent an RDBMS instance to run successfully. The causes of problems vary widely due to the variety of systems and configurations of students’ machines. Although both ADbC and WinRDBI have interactive SQL modules, they are not suitable alternatives in our case. This is because ADbC uses hardcoded examples and WinRDBI uses a Prolog engine to perform the actual database manipulation.
The challenges have become greater; the curriculum of the database course for non-CS students has been recently revised and now requires students to understand the roles of databases and SQL in real-world applications, particularly in Web applications. In order to build database Web applications — even a basic one, traditionally we need to have a Web development environment installed and configured properly on our machines. A Web development environment typically includes a Web server, an RDBMS, and a server-side programming language, among other things. For our non-CS students, setting up an RDBMS manually is already an unpleasant task, let alone the task of manually setting up a Web development environment on their machines. Also, with different types of operating systems installed on students and instructors’ machines, it can be difficult to manually set up the identical development environment on all platforms, which may lead to code examples not working on some machines. Clearly, a better way to set up a Web development environment is required.
Our database course for non-CS students will be offered again in the winter 2016 semester. This paper discusses the approach which will be used to address the mentioned problems and provide better learning experiences for our non-CS students. The remainder of this paper is organized as follows. Section 2 discusses the ERD drawing tools with a shallow learning curve. Section 3 discusses the approaches to set up a Web development environment quickly, easily, and in a completely reproducible way, and how the alternative approaches might be utilized in learning SQL and in building a simple database Web application. Section 4 draws some conclusions.
-
II. ERD Drawing Tools
Microsoft Visio is a software program for creating a wide range of professional looking diagrams including ERDs. It has typically been used by enterprise clients at the corporate level, IT professionals, and graphic designers. While Microsoft Visio is a powerful diagramming tool with a rich set of built-in shapes, objects, and stencils, it is complex and requires time for our non-CS students to master. As a result, our non-CS students usually choose to draw their ERD assignments by hand so that they can submit their assignments on time.
In this section, ERDPlus [7] and ER Assistant [8] are discussed as an alternative ERD drawing tool. Both ERDPlus and ER Assistant are designed specifically as a database modeling tool. They are free, intuitive, and very easy to use. Therefore, they are excellent tools for people who are trying to learn about databases. Figs. 1 and 2 show some screenshots of these tools when they are used to create ERDs. Since the entity-relationship model was introduced by Dr. Peter Chen in 1976 [9], several different notation sets have been utilized in their creation. There are perhaps six reasonably popular ERD notations, each having its own small variations that appear in practice [10]. Since there is no standard notation for ERDs, these tools end up using different notation sets to construct ERDs.
ERDPlus is a Web-based database modeling tool. It enables drawing standard ERD components including entities, attributes, and relationships. The notation used by the tool supports drawing regular and weak entities, various types of attributes (i.e., regular, unique, multivalued, derived, composite, and optional), and all possible cardinality constraints of relationships (i.e., mandatory-many, optional-many, mandatory-one and optional-one). The ER Assistant is another database modeling tool that runs on Microsoft Windows platform. It has similar features to those of ERDPlus. The ER Assistant also provides some nice features like documentation and diagram error checking.
Since ERDPlus is a Web-based tool, it can run on any platform through a Web browser as long as there is an internet connection. While the ER Assistant is simple to download and install, it only works on Microsoft Windows platform; in this case, Gliffy [11] can be considered as an alternative for students using other operating systems if there is any. Fig. 3 shows a screenshot of Gliffy when used to create an ERD.
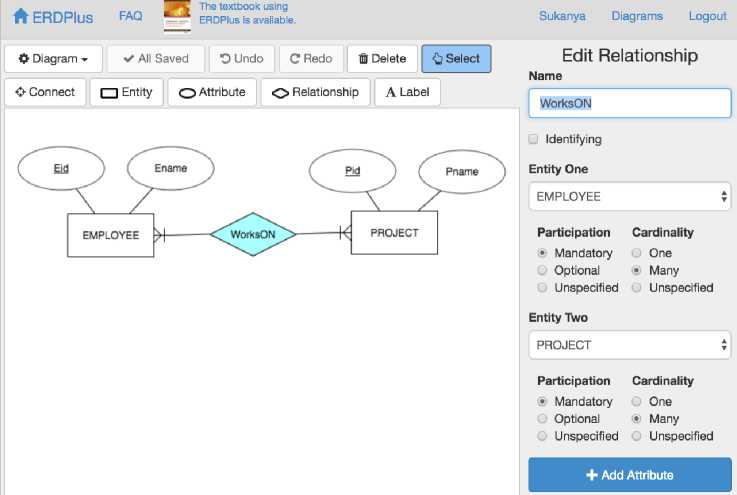
Fig.1. ERDPlus.
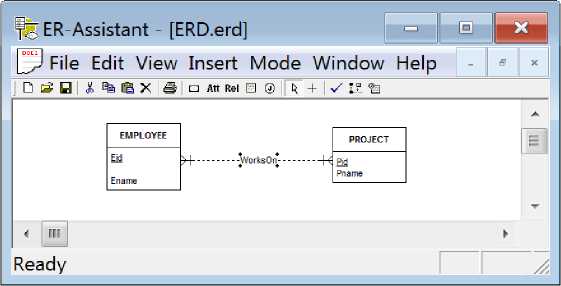
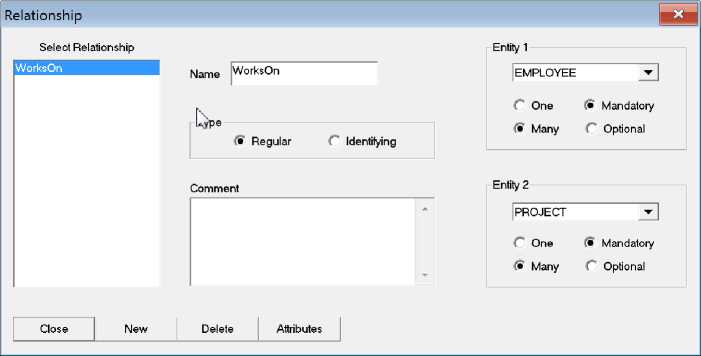
Fig.2. ER Assistant.
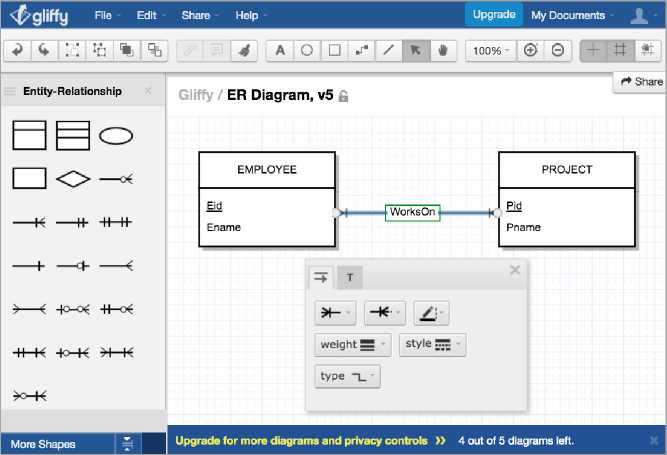
Fig.3. Gliffy.
Gliffy is a Web-based diagramming tool that can be used to create various types of diagrams including ERDs, flowcharts, network diagrams, organization charts, mind maps, Venn diagrams, wireframes, and UML (Unified Modeling Language). Gliffy provides an easy-to-use drag-and-drop interface, so we can simply drag-and-drop shapes from the library to the canvas and then point-and-click on the shapes to format them. Students can register for a free account, which allows them to draw up to five public diagrams that are enough for our class.
Unlike Gliffy, both ERDPlus and ER Assistant support diagram rules and does not require extra work to format the ERD components used in the diagrams, because both ERDPlus and ER Assistant are designed with database modeling in mind. In addition, the ERD notation sets used in the adopted textbook may be another factor to take into consideration when deciding which tool to use, since these tools use different ERD notation sets.
-
III. Web Development Environments
In this section, we will discuss a cloud IDE (Integrated Development Environment), virtualization with Vagrant, a no install version of MySQL with NetBeans IDE as an alternative approach to set up a Web development environment and provide examples of how these approaches might be used in the classroom.
-
A. A Cloud IDE
Cloud IDEs allow coding, testing and previewing projects in the cloud, which can be accessed from any computer. Most importantly, they remove the hassle of having to set up several tools before we can begin any coding and make it easier for everyone contributing to have the same setup. Examples of popular cloud IDEs are Codeanywhere, Codenvy, and Cloud9. Although they are somewhat different in terms of the features they offer, for our purpose, any of them can be used in the class and Codeanywhere [12] is selected as an example due to its simplicity. In the following, we will discuss how to setup Codeanywhere for our database class, how to use it to learn SQL, and how to use it for building a simple database Web application.
A1. Set Up
We first visit the Codeanywhere website at and sign up for a free account.
After we establish an account and sign in, we will see the Codeanywhere editor with the “Default” project being opened and the “Connection Wizard” being displayed, as shown in Fig. 4. Through the “Connection Wizard”, we will create a new container for PHP development environment by entering its name, choosing one out of the three PHP development stacks from the list, and then clicking “CREATE”. A container is a virtual private server (VPS) with its own 256MB of memory, 2GB of disk storage, and processing power, which is enough to build and run basic Web applications. A VPS runs its own operating systems, either Ubuntu or Centos, depending on which one we choose. When a PHP development stack is select, Apache, PHP, and MySQL will come preinstalled with our container. Our container is, in fact, a preconfigured PHP development environment that uses Apache as the Web server, PHP as the server-side scripting language installed on Apache, and MySQL as the RDBMS.
As soon as we have created a new container, there will be a workspace directory already set up in the file browser on the left and the “Info” page displayed on the right, as shown in Fig. 5. The workspace directory will have the same name as the container and is an important directory because it is where all of our files go. The “Info” page provides the detailed information about the newly created container, which we will access for information from time to time. We can also get to this “Info” page by right-clicking the container (i.e., the workspace directory) on the left and then choosing “Info”.
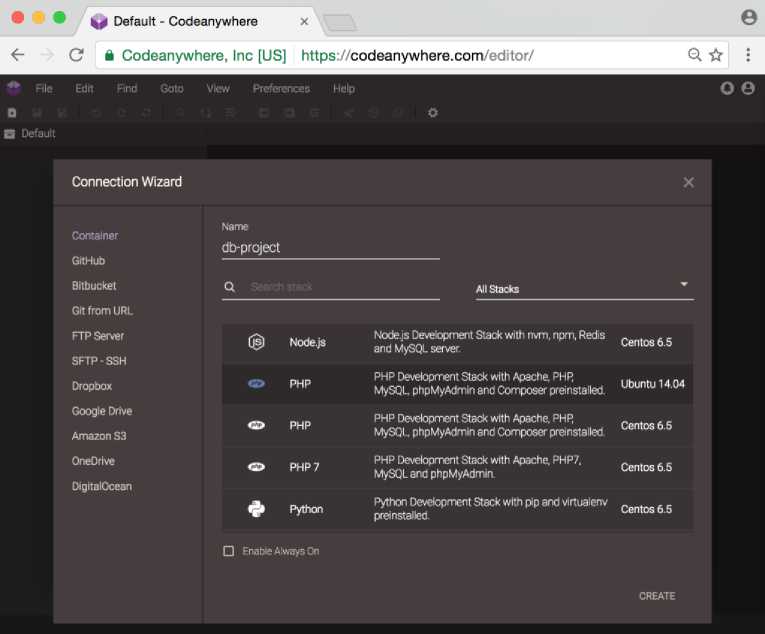
Fig.4. The Codeanywhere editor with the Connection Wizard.
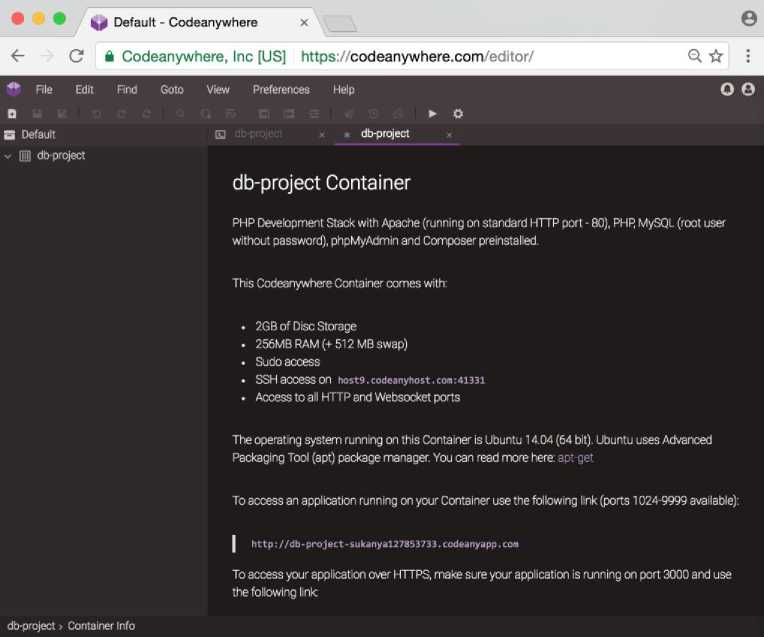
Fig.5. The Codeanywhere editor after a new container is created.
Note that any Codeanywhere container generated from a free account turns off after a certain period of inactivity, in which case we will see the label “[stopped]” displayed next to the container. In such a case, we can turn the container back on again by right-clicking the container and then choosing “Turn On”.
A2. Learn SQL
Since MySQL is already installed and configured in our container, we can use it to learn SQL. We can connect and interact with the MySQL server using a command-line client called “mysql” or a graphical user interface (GUI) client such as phpMyAdim, MySQL Workbench, or Navicat. Although the “mysql” commandline client is installed alongside MySQL server by default when MySQL server is installed, and is nevertheless invaluable for managing almost every aspect of a MySQL server, we will be working with MySQL using a GUI client because our non-CS students are particularly uncomfortable working from the command line. We will use phpMyAdmin, since it comes preinstalled with our container. phpMyAdmin is a Web application written in PHP and is one of the most popular MySQL’s GUI clients. To access phpMyAdmin in our Container, we just simply click on the corresponding link in the “Info” page. From that link, we can login with our username and password (i.e., root user without password) that is given at the top of the “Info” page.
Fig. 6 shows a screenshot of a phpMyAdmin running on our Codeanywhere container. On the left of the screen is a list of databases. At the top of the screen is a breadcrumb bar; it tells us that we are within the server and looking at the “sqldb” database, and within that database, we are currently looking at the “person” table. The localhost part here means that phpMyAdmin is running on the same machine as the MySQL server. Under the breadcrumb bar, we have some tabs such as “Browse”, “Structure”, and “SQL”. These tabs are context-dependent. The “Browse” tab has turned white to tell us that we are looking at or browsing the data. When we click on the “person” table listed on the left, the phpMyAdmin run a query for us automatically, which is SELECT * FROM `actor` LIMIT 0, 30 . This query means that we want to select all the fields from the “person” table and limit the number of rows returned to at most 30. We can tell from the result set that the “person” table has 7 fields and 6 rows.
We can edit or change the query easily by clicking on the “Inline” link, which will cause the query area to become editable, as shown in Fig. 7. Once we are done with the change, we can execute the query by clicking on the “Go” button. We can also execute the SQL query code through the “SQL” tab, which will give us a much larger area for entering SQL query code.
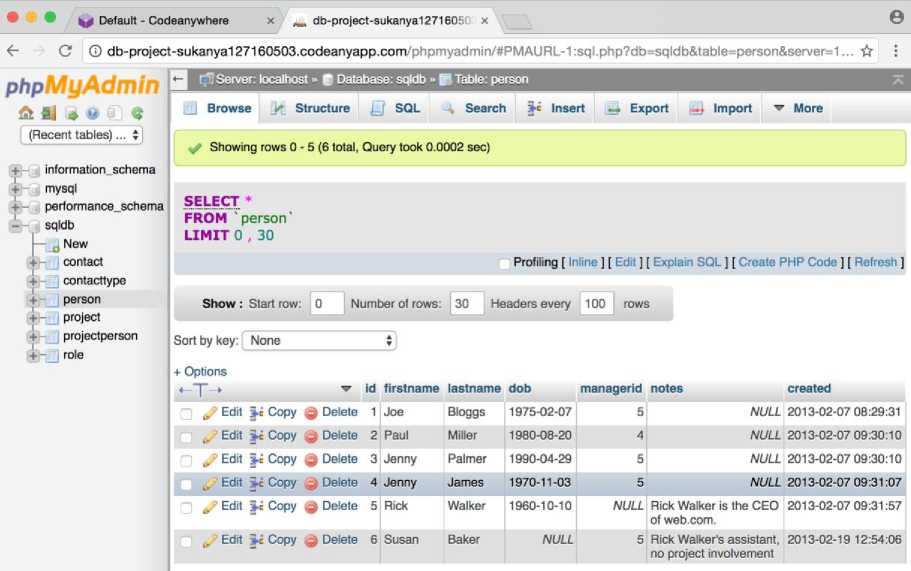
Fig.6. A screenshot of phpMyAdmin.
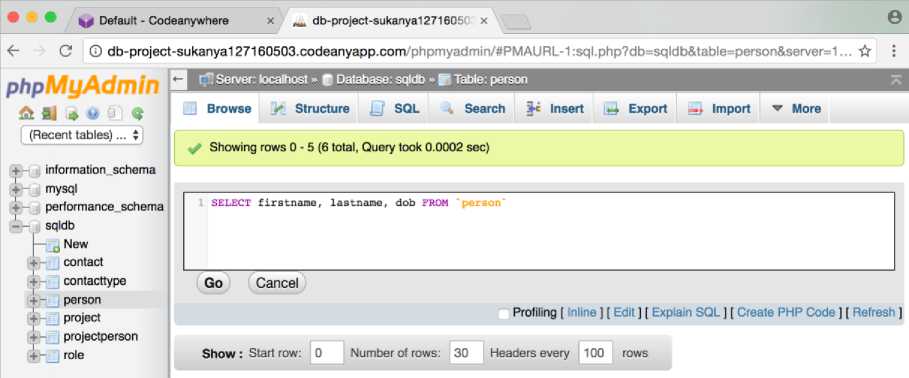
Fig.7. A screenshot of phpMyAdmin after the Inline link is clicked.
We note that although we can connect to the MySQL server running on a Codeanywhere container using a GUI client installed on our machine via SSH (Secure Shell) tunnel, we do not recommend this approach. This is because this approach is fairly complicated and on top of that it requires us to create an SSH tunnel every time our container is turned back on after a period of inactivity. The reason for this is that the SSH port of a Codeanywhere container generated from a free account will change on reboot.
A3. Build a Database Web Application
After the fundamental database concepts and SQL were explained, the final topic in our revised database curriculum is the role of a database in Web application development in which students will see the usefulness of a database within a Web application context. The primary role of a database in a Web application is to store and display updated information in a Web application. Ecommerce sites, Web-based email, and discussion forums are examples of Web applications that depend upon a robust database component.
To achieve this objective, we first lay down the basic concepts of Web application development. Next, we give students a basic PHP script to try out, walk students through the meaning of the PHP script, and show how a database can be used in a Web application. Fig. 8 shows an example of a PHP script that might be used in class. The script retrieves id, firstname, lastname, and dob fields of all the records from the “person” table that is created when learning SQL, and returns a Web page displaying all the retrieved records in an HTML table format. Since PHP files need to be processed in a Web server before sending their output to the Web browser, we need to place our PHP file inside the directory to be served up by the Apache Web server, which in our case is the workspace directory. After that, we can make a request to our PHP file by clicking the “Preview” button in the top menu bar of the Codeanywhere editor or by right-clicking the PHP file and then choosing “Preview”, and the result returned by the Apache Web server is shown in Fig. 9.
// db connection parameter
$db_server = "localhost"; $db_user = "root"; $db_password = ""; $db_name = "sqldb"
// connect to MySQL and database sqldb
$link = mysqli_connect($db_server, $db_user, $db_password, $db_name);
// SELECT from table and display results
$sql_statement = "SELECT id, firstname, lastname, dob FROM person";
$result = mysqli_query($link , $sql_statement);
?>
| firstname | lastname | dob ?> |
|---|---|---|
| '.$row[1firstname'].' | ';'. $row[1 lastname'].' | ';'.$row['dob'].1 | ';
?>
Fig.8. An example of a basic PHP script.
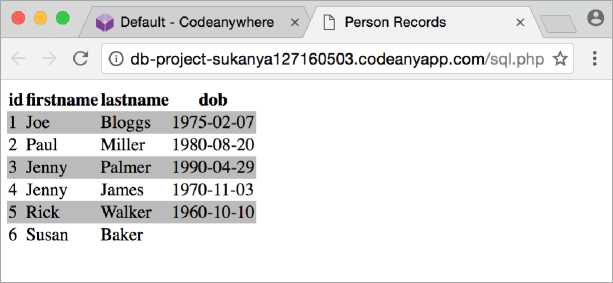
Fig.9. The result of the request for the example PHP script.
-
B. Virtualization with Vagrant
Vagrant [13] is a general-purpose software tool that simplifies the workflow and reduces the workload necessary to run and operate virtual machines on a computer [14]. If we were to run the virtual environment manually without using Vagrant, we would have to create a virtual machine, configure the virtual machine’s resources, install and configure an operating system on the virtual machine, and install the necessary software within the virtual machine. Vagrant shines when it is used for setting up a Web development environment. In this section, we will discuss how to use Vagrant to set up a PHP development environment. For this purpose, we will use a Vagrant box (i.e., a prepackaged virtual machine managed by Vagrant) called Scotch Box with phpMyAdmin, which is a copy of Scotch Box with the addition of phpMyAdmin. The Scotch Box [15] is a preconfigured Vagrant box that has a full array of PHP development stack features. Scotch Box is set up for use on the VirtualBox virtual machine. In the following, we will discuss how to setup the Scotch Box with phpMyAdmin for our database class, how to use it to learn SQL, and how to use it for building a simple database Web application.
-
B1. Set Up
Here are the steps to set up the Scotch Box with phpMyAdmin:
-
1. Download VirtualBox from the VirtualBox website at https://www.virtualbox.org/wiki/Downloads and install it. The installation process is very straightforward and requires no configuration at all.
-
2. Download Vagrant from the Vagrant website at https://www.vagrantup.com/downloads.html and install it. The installation process is very straightforward and requires no configuration at all.
-
3. Download Scotch Box with phpMyAdmin as a zip file from its GitHub repository at https://github.com/actuallymentor/scotch-box-with-phpmyadmin .
-
4. Create a project directory on our machine and extract all of the files and directories from the downloaded zip file to the newly created project directory.
-
5. Run the command vagrant up from our project directory to get our Scotch Box up and running.
If this is our first time, then the Scotch Box with phpMyAdmin will be downloaded automatically and added to Vagrant’s list of available boxes in our machine. After that, everything should be fast to start. By default, the IP address of our Scotch Box virtual machine will be 192.168.33.10. We can easily map this IP address to an easy to remember domain name (e.g., by editing the host file in our machine.
-
B2. Learn SQL
Since MySQL server and Apache Web server are already up and running and phpMyAdmin is already installed when our Scotch Box virtual machine is started, we can use phpMyAdmin to access our MySQL server to learn SQL. We can access phpMyAdmin at http://192.168.33.10/phpmyadmin/. If, for example, we map the IP address of 192.168.33.10 to in our hosts file, then we have an option to access phpMyAdmin with an easier address like After that, we can login with the Scotch Box’s default username and password of “root” and enter the SQL query code in the same manner as when we use the phpMyAdmin running on our Codeanywhere container.
Alternatively, we can use a standalone GUI client installed on our machine to access a MySQL server running on the Scotch Box virtual machine. Examples of the popular standalone GUI clients are MySQL Workbench, Navicat, and HeidiSQL. These standalone GUI clients will connect to the MySQL server running on the Scotch Box virtual machine using TCP/IP over an SSH connection. This connection method requires an SSH client installed on our machine and the connection parameters be set to the values shown in Table 1. An SSH client usually comes preinstalled on most Unix and Unix-like operating systems, such as Linux, OS X, and FreeBSD. On Microsoft Windows operating system, we need to manually install an SSH client such as PuTTy or install a program that contains an SSH client such as Git.
Table 1. Connection Parameters when using TCP/IP over SSH Connection
|
Parameter |
Value |
|
Database Username |
root |
|
Database Password |
root |
|
Database Hostname |
127.0.0.1 |
|
SSH Username |
vagrant |
|
SSH Password |
vagrant |
|
SSH Hostname |
192.168.33.10 |
-
B3. Build a Database Web Application
When we run the command vagrant up, Vagrant turns on sharing of a project directory by default. The project directory in our machine is now available in the Scotch Box virtual machine. This allows us to continue working on our project’s files on a machine using the tools (such as an editor) that we are used to, but use the resources in the virtual machine to compile or run our project. Scotch Box by default creates a “public” directory inside our project directory. The “public” directory is automatically synced to the directory to be served up by the Apache Web server in the Scotch Box virtual machine, and therefore is where our Web application lives. We can place the previously described PHP script (See Fig. 8) inside the “public” directory, however, with a slight modification of the user password for logging into the MySQL server running on the Scotch Box virtual machine. That is, the password needs to be “root” instead of a blank password. Since Apache is already up and running when our Scotch Box virtual machine is started, the only thing left for us to do is to make a request to our PHP file by typing its URL in the Web browser, which will follow the pattern of http://192.168.33.10/[PHP file]. As mentioned previously, we have an option to use a domain name instead of the IP address of 192.168.33.10 by editing the hosts file on our machine.
-
C. A No Install Version of MySQL with NetBeans IDE
This approach requires an instructor of the course to prepare a folder of no install version of MySQL for students in advance. Students just simply copy the prepared folder to their machines and they will be able to run a MySQL server on their machines without going through the hassle of installing and configuring it manually. Students can connect and interact with a MySQL server using any MySQL’s GUI client. Here, we will use NetBeans IDE, which comes bundled with great support for MySQL. It allows us not only to write a database Web application but also connect and interact with a MySQL server in the same manner as any other MySQL’s GUI client.
-
C1. Set Up
First, the instructor needs to prepare a folder of no install version of MySQL for operating systems installed on students’ machines, which mainly are Microsoft Windows with a small number of Mac OS X at our school. The steps to accomplish this task for both platforms are described as follows:
-
1. Download MySQL ZIP ARCHIVE (for Microsoft Windows) or MySQL Compressed TAR ARCHIVE (for Mac OS X) from http://dev.mysql.com/downloads/mysql/ .
-
2. Unzip or uncompress the downloaded archive file. We will get a directory that has the same name as the archive file. We will simply call this directory “MySQL”. For Mac OS X, we need to move the “MySQL” directory to /usr/local directory, change the directory permission to 777, and create a symbolic link to /usr/local/mysql.
-
3. Initialize MySQL server using the mysqld command with --initialize option. This will create the “data” directory inside the “MySQL” directory and a temporary root password. Note that this step is required for the current version of MySQL, which is 5.7 at the time of this writing; prior versions do not require this step.
-
4. Change the root password. To accomplish this task, we need to start the MySQL server, connect to the MySQL server using root and the temporary password, change the root password, and stop the MySQL server. We note that all the commands used here are mysqld , mysql , and mysqladmin , which are located in the “bin” directory inside the “MySQL” directory. mysqld is the MySQL start command, mysql is a command-line client, and mysqladmin is the MySQL administration tool that can be used to grant root permission for stopping the MySQL server.
-
5. (Optional) Create an example database for class.
Next, students need to copy the “MySQL” directory that is prepared by the instructor to their machines. For students using Microsoft Windows, they can copy the prepared “MySQL” directory to anywhere on their machines. For students using Mac OS X, they need to copy the prepared “MySQL” directory to /usr/local directory, change the directory permission to 777, and create a symbolic link to /usr/local/mysql.
After that, students need to download and install NetBeans IDE. We will download the NetBeans IDE with the Java EE pack, since it includes the GlassFish application server that allows us to run a Java Web application without going through the hassle of manually installing and configuring a Web server and/or an application server. Since NetBeans IDE requires JDK (Java Development Kit), we need to download and install it prior to installing NetBeans IDE. We can download JDK from Oracle website at technetwork/java/javase/downloads/ and
NetBeans IDE from NetBeans IDE website at The installation processes for both JDK and NetBeans IDE are very straightforward even for novices and require no configuration at all.
Finally, students need to register MySQL with NetBeans IDE. This will allow students to start, stop, and connect to a MySQL server through NetBeans IDE. Here are the steps to register MySQL with NetBeans IDE:
-
1. Right-click the “Databases” node in the “Services” tab on the left of the NetBeans IDE and choose “Register MySQL Server”. This will open the “MySQL Server Properties” dialog box as shown in Fig 10.
-
2. Go to the “Basic Properties” tab of the dialog box and enter our root password in the “Administrator password” field. We note that the NetBeans IDE automatically fills in the rest of the fields in this tab.
-
3. Go to the “Admin Properties” tab of the dialog box and enter information for controlling the MySQL Server as shown in Fig 10.
As soon as we finish registering MySQL server, we will see the “MySQL Server” node in the “Services” tab of the NetBeans IDE as shown in Fig 11. Now we can start or stop the MySQL server by right-clicking the “MySQL Server” node and then choosing “Start” or “Stop”.
-
C2. Learn SQL
Once the MySQL server is started, we can establish a connection to the desired database on the MySQL server by right-clicking the desired database under the “MySQL Server” node and choose “Connect”. As a result, we will see the established connection node (which in our case is jdbc:mysql://localhost:3306/sqldb?zeroDateTime Behavior=convertToNull [root on Default
schema]). After that, we will right-click the established connection node and choose “Execute Command” to open the NetBeans IDE’s SQL Editor in the main window. From here, as shown in Fig. 11, we can enter SQL statements and then click the database icon at the top right of the SQL Editor window to execute the SQL statement where the mouse cursor is.
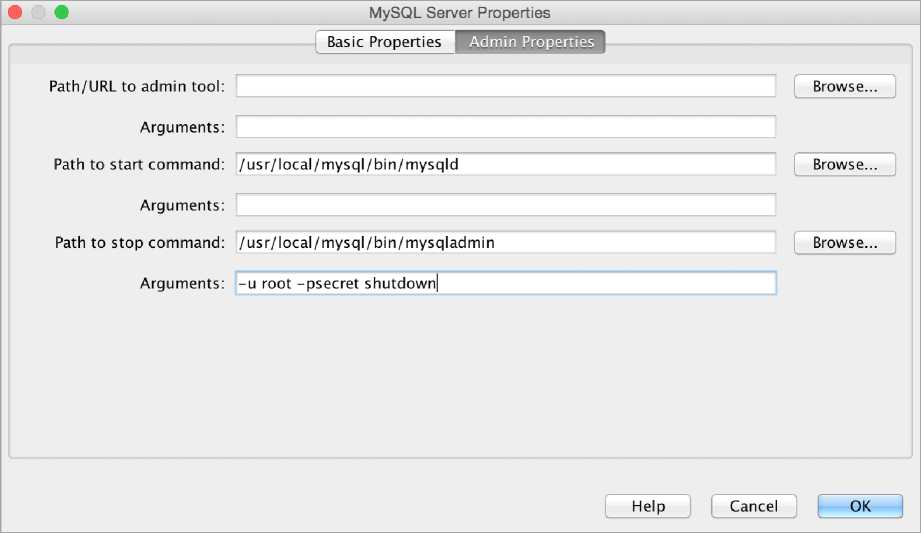
Fig.10. MySQL Server Properties dialog box.
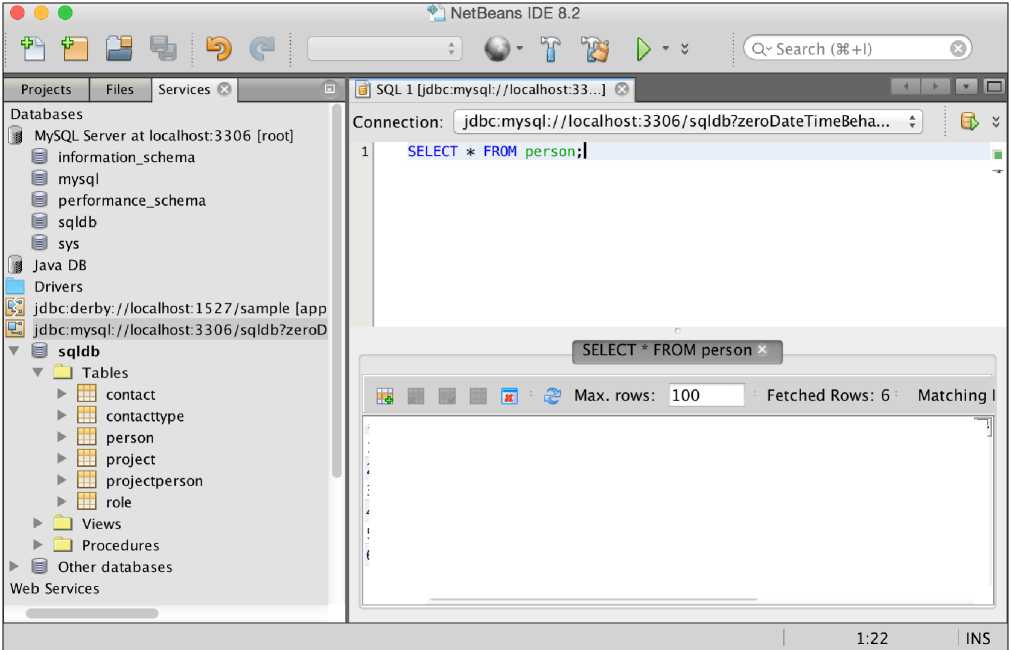
Fig.11. NetBeans IDE’s SQL Editor in the main window.
|
# id firstname |
lastname dob |
managerid notes |
|||
|
1 1 |
Joe |
Bloggs |
1975-02-07 |
5
|
|
|
2 2 |
Paul |
Miller |
1980-08-20 |
4
|
|
|
3 3 |
Jenny |
Palmer |
1990-04-29 |
5
|
|
|
4 4 |
Jenny |
James |
1970-11-03 |
5
|
|
|
5 5 |
Rick |
Walker |
1960-10-10 |
|
|
|
6 6 |
Susan |
Baker |
|
5 Rick Walker's assistant, n |
|
C3. Build a Database Web Application
NetBeans IDE with Java EE pack comes bundled with the GlassFish application server, so we can write a JSP (JavaServer Pages) script and deploy on the GlassFish application server. JSP is similar to PHP but it uses the Java programming language. In plain English, GlassFish is a Web server that allows us to deploy Web applications written in Java. Fig.12 shows a basic JSP script that produces the same result (See Fig. 9) as the PHP script (See Fig. 8) described in an earlier section. To help students get a Java database Web application up and running quickly and easily, an instructor of the class should prepare and give students a copy of a project folder that includes an example JSP file and necessary library like MySQL connector/j for connecting Java Web application with the MySQL database. To run the example JSP script, students need to open the class’ project (which in our case is the “DatabaseWebApp” project) by clicking “Open Project” under the “File” menu of the NetBeans IDE, then right-clicking the example JSP file (which in our case is the “database.jsp”) and choosing “Run File”.
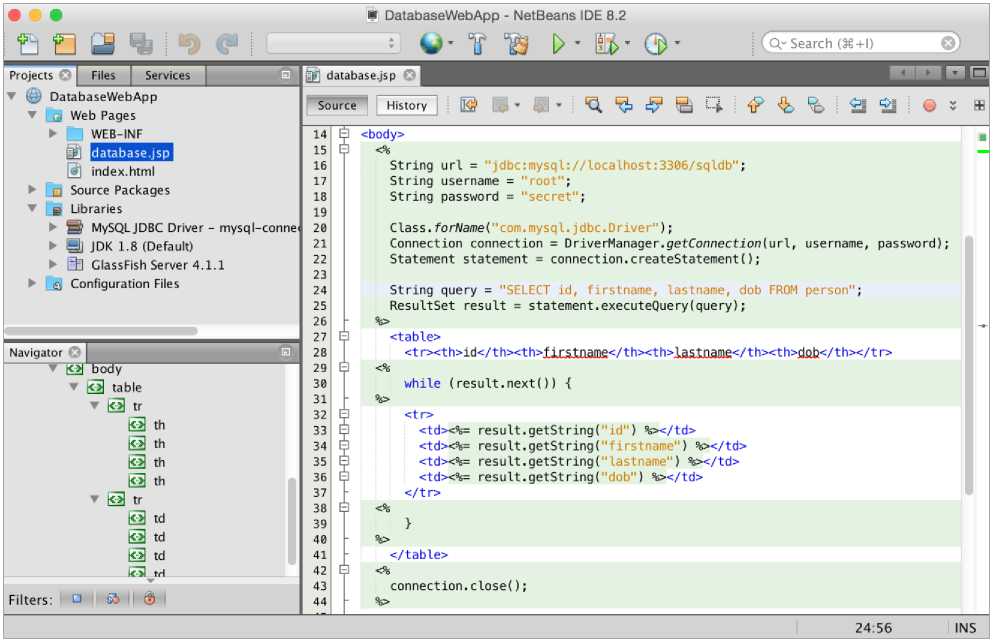
Fig.12. An example of a basic JSP script.
-
IV. Conclusion
This paper discusses the technical difficulties faced by our non-CS students in their database class and an approach to solving these problems. This first problem is that our non-CS students could not use Microsoft Visio to draw their ERD assignments in a timely manner. While the tool is popular among CS students and instructors, it has a steep learning curve and thus not an appropriate tool for our non-CS students. ERDPlus, ER Assistant, and Gliffy can be considered as alternatives. They are free and easy to use. While ERDPlus and Gliffy are Webbased tools, ER Assistant is a desktop program that runs on Microsoft Windows platform. Both ERDPlus and ER Assistant support diagram rules, but Gliffy does not. The ERD notation sets used by these tools are different and should be taken into consideration when deciding which one to use in class.
The second problem is that installing and configuring an RDBMS requires a lot of effort and time from our non-CS students that could otherwise be used productively in learning SQL. The third problem is that we need a Web development environment that can be set up quickly, easily, and in a completely reproducible way. A Web development environment is a new requirement imposed by the recently revised curriculum of our database course for non-CS students. Cloud IDEs, virtualization with Vagrant, and a no install version of MySQL with NetBeans IDE can be considered solutions to our second and third problems.
With Codeanywhere, as soon as we have built a new container with PHP development stack, we will have a PHP development environment that is already set up with a recent version of Apache, MySQL, and PHP. Since an RDBMS such as MySQL is one of the core components of most Web development environments, we can use it to learn SQL without going through the hassle of manually installing and configuring it. We can connect and interact with the MySQL server using phpMyAdmin, which is one of the most popular MySQL’s GUI clients and comes preinstalled with our container. Keep in mind that an internet connection is necessary while using Codeanywhere, and any container generated from a free account turns off after a certain period of inactivity — if that happens, we need to turn the container back on before we can use it again.
With Vagrant and its base box like Scotch Box with phpMyAdmin, a virtual machine with an already set up PHP development environment will be up and running by using just one command — vagrant up . In addition to phpMyAdmin that is installed when the virtual machine is started, we can connect to the MySQL Server running on the virtual machine using a program of our choice through TCP/IP over an SSH connection. The setup for such a case is easier than Codeanywhere and only needs to be performed once, not every time we start a virtual machine like Codeanywhere. While we still need to download and install Vagrant and virtualization software such as VirtualBox manually, the processes are rather straightforward even for novices and require no configuration at all. Vagrant by default will sync a project directory on our machine to the virtual machine, allowing us to continue working on our project’s files on our machine using the tools such as an editor that we are used to, but use the resources in the virtual machine to compile or run our project. Keep in mind that running a virtual machine can consume quite a bit of hardware resources on the host machine; for example, it is not unusual to see the situation where the host machine is running out of disk space. Therefore, we need to ensure that our host machines have enough hardware resources when using this approach.
With a no install version of MySQL and NetBeans IDE, students just simply copy the directory of a no install version of MySQL, which is prepared by an instructor of the course, to their machines and they will be able to run a MySQL server on their machines without going through the hassle of installing and configuring it manually. Students can connect and interact with a MySQL server and write a database Web application using the NetBeans IDE with Java EE pack. The installation process for NetBeans IDE is very straightforward even for novices and requires no configuration at all. This approach requires an instructor of the course to prepare a folder of no install version of MySQL for operating systems installed on students’ machines, which mainly are Microsoft Windows with a small number of Mac OS X at our school.
Список литературы An Approach to Solving Technical Difficulties Facing Non-CS Students in a Database Class
- S. W. Dietrich, "WinRDBI Educational Tool," http://winrdbi.asu.edu. (accessed August 2016)
- S. W. Dietrich, E. Eckert, and K. Piscator, "WinRDBI: a Windows-based Relational Database Educational Tool," Proceedings of the twenty-eighth SIGCSE technical symposium on Computer Science Education, 1997, pp. 126–130.
- M. Murray, "Animated Database Courseware: Interactive Approach for Teaching the Principles of Database Concepts," http://adbc.kennesaw.edu. (accessed August 2016)
- M. Murray and M. Guimaraes, "Animated Database Courseware: Using Animations to Extend Conceptual Understanding of Database Concepts," Journal of Computing Sciences in Colleges, Vol. 24, No. 2, December 2008, pp. 144-150.
- S. W. Dietrich and D. Goelman, "Databases for Many Majors," http://databasesmanymajors.faculty.asu.edu. (accessed August 2016)
- S. W. Dietrich, D. Goelman, C. M. Borror, and S. M. Crook, "An Animated Introduction to Relational Databases for Many Majors," IEEE Transaction. on Education, Vol. 58, No. 2, May 2015, pp. 81-89.
- ERDPlus, https://erdplus.com. (accessed October 2016)
- ER Assistant, http://er-assistant.software.informer.com. (accessed October 2016)
- P. Chen, "The Entity-Relationship Model—Toward a Unified View of Data," ACM Transactions on Database Systems, Vol. 1, No. 1. March 1976, Pages 9-36.
- M. Mannino, Database Design, Application Development, and Administration, 6th ed., Chicago Business Press, 2014, ch. 5, pp. 45.
- Gliffy, https://www.gliffy.com. (accessed November 2016)
- Codeanywhere, https://codeanywhere.com. (accessed November 2016)
- Vagrant, https://www.vagrantup.com. (accessed September 2016)
- W. Gajda, Pro Vagrant. 1st ed., Apress, 2015.
- Scotch Box, https://box.scotch.io. (accessed September 2016)

