Analysis of Host-Based and Network-Based Intrusion Detection System

Author: Amrit Pal Singh, Manik Deep Singh
Journal: International Journal of Computer Network and Information Security(IJCNIS) @ijcnis
Article in issue: 8 vol.6, 2014.
Free access
Intrusion-detection systems (IDS) aim at de-tecting attacks against computer systems and networks or, in general, against information systems. Its basic aim is to protect the system against malwares and unauthorized access of a network or a system. Intrusion Detection is of two types Network-IDS and Host Based- IDS. This paper covers the scope of both the types and their result analysis along with their comparison as stated. OSSEC (HIDS) is a free, open source host-base intrusion detection system. It performs log analysis, integrity checking, Windows registry monitoring, rootkit detection, time-based alerting and active response. While Snort (NIDS) is a lightweight intrusion detection system that can log packets coming across your network and can alert the user regarding any attack. Both are efficient in their own distinct fields.
IDS, NIDS, HIDS, OSSEC, SNORT, Se-curity
Short address: https://sciup.org/15011331
IDR: 15011331
Text of the scientific article Analysis of Host-Based and Network-Based Intrusion Detection System
Published Online July 2014 in MECS
Intrusion detection system is Hardware and Software application which monitors various Networks and System for Intrusions, Network packets, Root kit analysis or even System Logs and report these observations to the main server or keeps a record in machine. IDS keep a check on network and system for various attacks (Malicious events) which can intrude and crumble the functioning system. There are various types of attacks which include a) Scanning Attack – using scanning techniques, attacker can get information about the system configurations and security level, using this information the attacker may attack the system (Stealth Attack). b) Denial of Service Attack – In this type of attack, attackers try to make resources unavailable which are required by the users. (i.e. Denying users the access to particular resource), c) Penetration Attack - It possess all the attacks, in which attacker attacks the system as a Root, by this attack, the attacked system can be used to attack other connected systems as well. To detect these attacks, apart from IDS we can also use Firewalls but they are not dynamic in nature and have simple rules to allow or deny protocols, while IDS is used in dealing with more complex attacks and is also dynamic in nature.
HIDS (Host Based IDS) is the first kind of IDS and its main function is internal monitoring (within a computer or machine), but now a days many variants of HIDS have developed which can be used to monitor network. HIDS determine if a system has been compromised and warn administrators correspondingly [1]. In this research we have used, OSSEC tool to observe the characteristics of HIDS. OSSEC is an open source tool dedicated to HIDS which performs log analysis, file integrity checking, and policy monitoring, root-kit detection, real-time alerting and active response.
A network-based intrusion detection system (NIDS) is used to monitor and analyze network traffic to protect a system from network-based threats. A NIDS reads all inbound packets and searches for any suspicious patterns. When threats are discovered, based on its severity, the system can take action such as notifying administrators, or barring the source IP address from accessing the network [2]. Snort is open source tool, designed for NIDS and prevention systems (NIPS). Snort can work in 3 modes; sniffer, packet logger, and network intrusion detection; they include live tracking of the packets, compiling the information in logs and to work as prevention system.
Another type is Hybrid Intrusion Detection, in such systems both Host-based and Network-Based Intrusion detection are used together, so as to provide more flexibility and security to a system. These kinds of system usually have advanced characteristics in terms of traffic, placement of the IDS and type of alerts and these characteristics can be changed according to the requirement [3].
In another scheme IDS can be characterized in terms of two groups which are:
-
a. Mis-use Based Intrusion detection system.
-
b. Anomaly Based Intrusion detection system.
Mis-use Based IDS is basically when IDS uses past behaviors or Log files to check for the alerts or attacks, and is also known as Knowledge-Based IDS.
Signature-Based IDS looks for packets and compare them with the predefined rules or signatures defined in the database. Alerts are generated on the basis of the result of the comparison. The rules can be downloaded from the software website and rules can be dynamically updated [4].
Anomaly Based IDS works by identifying patterns from users or group of users, already defined in the past. This type of technique looks for variations in behavior which might indicate masquerade. It involves increased amount of processing which is used by anomaly detector for studying the behavior of the system from its audits [5].
The scope of this paper resolves on characteristic analysis of NIDS and HIDS. In the second section Architecture of IDS has been discussed in this paper with emphasis on NIDS (SNORT) and HIDS (OSSEC) considering the important and required environment for implementing NIDS and HIDS in the third section. In the final section, experimental analysis of the NIDS and HIDS is discussed along with the detailed comparison between network and host based IDS. We have also tried to cover the future scope of this research in the conclusion and future scope section.
-
II. Architecture
Architecture of IDS can be of various types, that is it can be differently placed in the system according to the type of result required. It is different for NIDS and HIDS, and we can conclude; that by simply changing the position of an IDS tool we can get various efficient results.
The major types of architecture can be:
-
1. Centralized : In this, data is collected from single or multiple hosts. All the data is then shipped to a central location for analysis.
-
2. Hierarchical : In this, data is collected from multiple hosts. Data is then analyzed as it is passed up through the layers.
-
3. Distributed : In this, data is collected at each host; Distributed analysis of the data takes place.
If we consider Host base IDS, for example OSSEC (Developed by Daniel B. Cid), there should be 1 Server on which OSSEC Server should be installed. The server machine should be on Linux/Unix environment. OSSEC Client should be installed in all those computers which are connected in the network other than server. They must be connected to each other via LAN. Client Computers need not be necessary to be in Linux/Unix environment. In the conclusion we can say that in HIDS
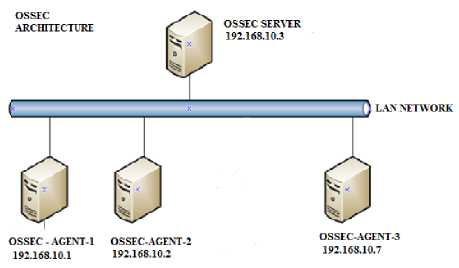
Fig. 1. OSSEC Client Server Architecture there is always one Host and other Clients in a network. In terms of Network based IDS; we will be getting knowledge about SNORT (created by Martin Roesch in 1998 and is developed by Source fire) its placement and Installation. Placing /Installing snort is totally dependent on our goal or in simple terms what do we need to achieve from it [6]. A SNORT sensor when placed between a router and firewall is very advantageous, as we get to monitor all of the traffic in the network. If we place snort sensor, outside firewall we can get the information about the type of data which is not stopped by firewall. SNORT is very flexible in the placements and efficiency; we can achieve a lot of results with it. In snort we are not required to install snort on every host or client as we did in HIDS, it can be placed on above mentioned positions and it is good to go [7].
-
III. Establishing Environment
-
A. Deployment of OSSEC:
OSSEC (HIDS) provides a number of functions, its primary role is log monitoring and alerting based on log alerts, and other roles such as file system integrity checking, and root kit detection. OSSEC will allow us to notice if someone is attacking or taking over our server. OSSEC runs on both Windows and Linux, unlike SNORT; which has certain constraints.
Tuning is easy and we will only need to tune out a few things to reduce the number of alerts receive as the rate of false positives is very low.
Installation and configuration:
-
• Wget- http://www.ossec.net/files/ossec-hids-
- 2.1.1.tar.gz
-
• tar zxvf ossec-hids-2.1.1.tar.gz
-
• cd ossec-hids-2.1.1
-
• sudo ./install.sh
-
1. What kind of installation do you want (server, agent, local or help)?
-
i. For a basic installation to a single server, select 'local'. This creates a single install to monitor only the server.
-
2. Setting up the installation environment.
-
i. Choose where to install the OSSEC HIDS [/var/ossec]:
-
ii. Installation will be made at /var/ossec.
-
3. Configuring the OSSEC HIDS.
-
i. Do you want e-mail notification? (Y/N) [y]:
-
ii. What's your e-mail address? -- enter your email Address here
-
iii. We found your SMTP server as: example.test.com.
-
iv. Do you want to use it? (Y/N) [y]:
-
v. What's your SMTP server ip/host? Enter your preferred smtp server here
-
vi. Do you want to run the integrity check daemon? (Y/N) [y]: (This is for file integrity checking, alerts you to changes to Files on your system)
vii. Running syscheck (integrity check daemon). viii. Do you want to run the root kit detection engine?
(Y/N) [y]:
ix. Running root check (root kit detection).
x. Do you want to enable active response? (Y/N) [y]: (This can block attacks that meet certain rules).
If ‘yes’ is selected for active response then Intrusion Prevention capability are added, this is a good thing but keep in mind it is a good idea to white list your own IP's as you don't want active response to trigger against your own IP and auto block your access. This could happen if you fail multiple ssh logins, or if you were to run a vulnerability scan against your IP - as OSSEC would detect this as an attack. So your IP would get blocked, and then you would be unable to ssh to your server for example to manage it. After compiling is complete you will be presented with final instructions:
-
i. System is Debian (Ubuntu or derivative).
-
ii. Init script modified to start OSSEC HIDS during boot.
-
iii. Configuration finished properly.
-
iv. To start OSSEC HIDS: /var/ossec/bin/ossec-
- control start
-
v. To stop OSSEC HIDS: /var/ossec/bin/ossec-
- control stop
-
vi. The configuration can be viewed or modified at /var/ossec/etc/ossec.conf
The OSSEC environment is established. We can perform server/local/client installation in the same way and secure the system.
-
B. Managing Clients and Agents.
To run manage agents, execute the following command on the OSSEC server as a user with appropriate privileges (e.g. root): # /var/ossec/bin/manage_agents
Now choose one of the actions.
-
1) Adding an agent
-
i. To add an agent type A in the start screen:
-
ii. Provide a name for the agent to be added. This can,
for example, be the host name. In this example the agent name will be agent1.
-
iii. After that specify the IP address for the agent. This can either be a single IP address (e.g. 192.168.1.25), a range of IP’s (e.g. 192.168.2.0/24).
-
iv. The last information you will be asked for is the ID you want to assign to the agent. Manage agents will suggest a value for the ID. This value is the lowest positive number that is unique. The ID 000 is assigned to the OSSEC server. To accept the suggestion, simply press ENTER. To choose another value, type it and press ENTER.
-
v. Now confirm adding the agent. After that manage agents appends the agent information to /var/ossec/etc/client.
-
2) Extracting the key for an agent
After adding an agent, a key for the agent is created that has to be copied to the agent. To get the key, use the E option in the manage_agents start screen. List of all agents already added to the server, to extract the key for an agent, simply type in the ID of the respective agent. It is important to note that you have to enter all digits of the ID. You can now copy that key to the agent1 and import it there via the agent version of manage agents.
-
3) Establishing environment for Email Alerts.
Every alert has a severity level from 0 to 15, with 15 being the highest and 0 be the lowest. By default, the OSSEC HIDS logs every alert with a severity level of 1 to 15. In addition, the OSSEC HIDS generates email messages for every alert above 7 severity level. If you want to change how severity levels are handled. In the following example, we have switched the configuration to only log for severities Above 2 and only send emails for severities above 8.
This will make sure that only those errors or alerts generated by OSSEC will reach user email account whose severity is 8 or more than 8.
-
4) OSSEC defined alert levels
OSSEC has pre-defined alert levels in its system. Severities of the alert level vary from 00 to 15. Definitions of these alerts are as follows:
-
i. 00 - Ignored - No action taken. They include events with no relevance to security.
-
ii. 01 – None.
-
iii. 02 - System low priority notification – It informs about the system status and notifications.
-
iv. 03 - Successful/Authorized events – they deal with information of legitimate logins, and positive improvisation of firewalls and etc.
-
v. 04 - System low priority error – They are mainly the errors related to bad configurations or unused devices.
-
vi. 05 - User generated error - They include missed passwords, denied actions etc.
-
vii. 06 - Low relevance attack – They inform about the worms or viruses, which generally are not a threat for the system.
-
viii. 07 - "Bad word" matching. This alert includes words like "error", etc. These alerts may have some security relevance.
-
ix. 08 - First time seen – These alerts comprised of events which are new to the system, or in other words these include alerts for the events which are implemented for the first time on the system. It also includes security relevant actions.
-
x. 09 - Error from invalid source – This alert includes attempts to login from an invalid source. May have security relevance. Admin or Root account also falls under this alert.
-
xi. 10 - Multiple user generated errors – This alert include multiple failed logins or authentication alerts etc.
-
xii. 11 - Integrity checking warning – This alert
include information about the modification of binaries or the presence of rootkits.
-
xiii. 12 - High importance event – These alerts include error or warning messages from the system, kernel, etc. These alerts can be referred to attacks on certain applications.
-
xiv. 13 - Unusual error (high importance) - Most of the times it matches a common attack pattern.
-
xv. 14 - High importance security event. It indicates an attack.
-
xvi. 15 - Severe attack –Immediate attention is
necessary.
-
C. Establishing Environment for (NIDS) – SNORT
Snort is Network Intrusion Detection System (NIDS). Snort can sniff network and produce alerts based on the rules defined in Snort data base, if there is an attack on computers network. It is an open source system that was built from tcpdump (Linux sniffer tool).
The first step is to ensure that the following packages are installed:
^ Nmap ^ Apache2 ^ Php5-mysql
^ Libpcap0. 8 -dev ^ G++
^ Flex
^ Make
^ Libtool
^ Libmysqlclient-i
^ Nbtscan ^ Php5 ^ Php5-gd ^ Libpcre3-dev ^ Gibson ^ Libcap-ruby ^ Autoconf ^ Mysql-server
-
1) Download and Set up Snort Report.
We can install snort packages from Ubuntu 10.04 repositories
-
- >sudo tar zxvf snort-2.9.3.tar.gz ->cd snort-2.9.3
-
■ ^sudo ./configure --prefix=/usr/local/snort --
- enable-sourcefire
-
■ ^sudo make -^sudo make install
-
■ ^sudo mkdir /var/log/snort
-
■ ^sudomhd^r var/snort -^sudo groupadd snort
■^sudo useradd -g snort snort -^sudo chown snort:snort /var/log/snort
-
2) Download Latest Snort Rules.
-
3) Edit and configure snort.conf.
By these steps we can set-up the environment and configure both type of IDS tools which are NIDS and HIDS.
-
IV. Result Analysis
-
A. Result analysis of HIDS- OSSEC tool.
After establishing and deploying perfect environment for OSSEC (HIDS TOOL), we were able to test its abilities and experiment how OSSEC responds to various threats. The best feature of this tool is that it gives us immediate E-mail notifications if any kind of threat is experienced. Apart from e-mailing it got other reporting features as well, such as:
-
• Sending alerts via syslog: Syslog output allows an OSSEC manager to send the OSSEC alerts to one or more syslog servers. OSSEC also supports sending alerts via cef, json, and to Splunk [8].
-
• Sending output to a Database: OSSEC supports MySQL and PostgreSQL database outputs [9].
-
• Sending output to prelude: Prelude is a Hybrid IDS that uses IDMEF to receive alert information from external devices [10].
|
root^ubuntu:'# ps aux |
||||||||||
|
USER |
PIO %CPU XMEM |
vsz |
RS5 TTY |
STAT |
START |
TIME |
COMMAND |
|||
|
root |
1 |
0.6 |
0.0 |
24472 |
2452 |
7 |
5S |
13:45 |
6:62 /sbin/init |
|
|
root |
2 |
8.0 |
0,0 |
e |
0 |
7 |
5 |
13:45 |
0:00 |
[kthreadd] |
|
root |
3 |
0.0 |
0.0 |
0 |
0 |
7 |
5 |
13:45 |
0:08 |
[ksofttrqd/e] |
|
root |
$ |
8.0 |
0,0 |
0 |
0 |
7 |
S< |
13:45 |
0:00 |
[киюгкег/е:ен] |
|
root |
7 |
0-0 |
0.0 |
0 |
0 |
7 |
S< |
13:45 |
0:06 |
[kworker/u:6H] |
|
root |
a |
0.0 |
0,0 |
0 |
0 |
7 |
S |
13:45 |
6:00 |
[mtgration/e] |
|
root |
9 |
0.0 |
0.0 |
6 |
0 |
7 |
$ |
13:45 |
6:00 |
[rcu_bh] |
|
root |
10 |
0.6 |
0.0 |
0 |
6 |
7 |
$ |
13:45 |
0:11 |
[rcu_5chedj |
|
root |
11 |
0.0 |
6.0 |
0 |
0 |
? |
5 |
13:45 |
6:66 |
[watchdog/6] |
|
root |
12 |
0.0 |
6.6 |
0 |
0 |
7 |
5 |
13:45 |
6:66 |
[watchdog/1] |
|
root |
13 |
0.6 |
6.6 |
6 |
0 |
7 |
5 |
13:45 |
6:87 |
[ksoftirqd/l] |
|
root |
16 |
6.0 |
0.6 |
0 |
0 |
7 |
S< |
13:45 |
6:66 |
[kworker/l:0H] |
|
root |
17 |
0.6 |
6.0 |
0 |
0 |
7 |
S< |
13:45 |
8:88 |
[cpuset] |
|
root |
la |
0.6 |
0.0 |
6 |
6 |
7 |
S< |
13:45 |
6:86 |
[khelper] |
|
root |
19 |
0.0 |
0.0 |
e |
6 |
7 |
S |
13:45 |
8:88 |
[kdevtmpfs] |
|
root |
20 |
0.0 |
0.0 |
6 |
0 |
7 |
S* |
13:45 |
8:88 |
[netnsj |
|
root |
21 |
0.0 |
6.0 |
0 |
0 |
7 |
s |
13:45 |
8:86 |
[bdi-default] |
|
root |
22 |
0.0 |
6.6 |
0 |
6 |
7 |
s< |
13:45 |
8:88 |
[ktntegrttyd] |
|
root |
23 |
0.0 |
0.0 |
6 |
0 |
7 |
s< |
13:45 |
8:06 |
[kbiockd] |
|
root |
25 |
0.0 |
0.0 |
0 |
0 |
7 |
s< |
13:45 |
8:88 |
[ata_sff] |
|
root |
26 |
0,0 |
0.6 |
0 |
0 |
7 |
s |
13:45 |
8:88 |
[khubd] |
|
root |
27 |
0.0 |
0.0 |
0 |
0 |
7 |
s< |
13145 |
8:88 |
(Md] |
|
root |
28 |
0„0 |
0.0 |
0 |
0 |
7 |
s< |
13:45 |
8:80 |
[devfreq_wq] |
|
root |
30 |
0.0 |
0.0 |
0 |
0 |
7 |
s |
13:45 |
8:86 |
[khungtaskd] |
|
root |
31 |
0.0 |
0.0 |
0 |
0 |
? |
s |
13:45 |
0:81 |
(kswapdoj |
|
root |
32 |
0.0 |
0.0 |
0 |
0 |
7 |
SN |
13:45 |
6:00 |
[ksmd] |
|
root |
33 |
0.6 |
6.6 |
0 |
0 |
7 |
SN |
13:45 |
6:66 |
[khugepaged] |
|
root |
34 |
6.0 |
6.6 |
0 |
0 |
7 |
S |
13:45 |
0:00 |
[fsnotifyjnark] |
|
root |
35 |
0,0 |
0.0 |
0 |
0 |
? |
5 |
13:45 |
8:06 |
[ecryptfs-kthr] |
|
root |
36 |
0,0 |
0.0 |
0 |
0 |
7 |
S< |
13:45 |
8:60 |
[crypto] |
|
root |
47 |
6,0 |
0.0 |
0 |
0 |
S< |
13:45 |
0:00 |
[kthrotld] |
|
|
root |
50 |
0.0 |
O.O |
0 |
0 |
7 |
5 |
13:45 |
0:08 |
[scst_eh_e] |
|
root |
51 |
0.0 |
0,0 |
0 |
0 |
7 |
S |
13:45 |
8:00 |
[scst_eh_l] |
|
root |
S3 |
0.0 |
6.0 |
0 |
0 |
7 |
5 |
13:45 |
6:66 |
[scst^eh 2] |
|
root |
54 |
0.0 |
0,0 |
0 |
0 |
7 |
S |
13:45 |
6:60 |
[5CSi_eh_3] |
|
root |
58 |
0.0 |
0.0 |
0 |
0 |
7 |
5< |
13:45 |
0:00 |
[binder] |
|
root |
77 |
6,0 |
0,0 |
0 |
0 |
7 |
5< |
13:45 |
0:66 |
(deferwqj |
|
root |
78 |
0.0 |
0.0 |
0 |
0 |
7 |
S< |
13:45 |
6:66 |
(charger.manag] |
|
root |
228 |
0.0 |
0.0 |
0 |
0 |
7 |
5< |
13:45 |
6:60 |
[firewire] |
|
root |
249 |
6.5 |
0.0 |
15856 |
1236 |
7 |
$5 |
13:45 |
1:24 mount,ntfs /dev |
|
|
root |
256 |
0.1 |
0.0 |
0 |
0 |
? |
s< |
13:45 |
6:25 [loope] |
|
Fig. 2. OSSEC logs reading
OSSEC notification on emails for alert level-10:
OSSEC HIDS Notification.
2006 Sep 18 17:19 54
Received From: mh2-> var log auth log
Rule: 40111 fired (level 10) •> "Multpie authentication failures."
Portion of the log(s):
sshd[7435]: Failed password for root from 64.219.97.248 port 51901 ssh2 sshd[7433]: Failed password for root from 64 219.97.248 port 51224 ssh2 sshd[7427]: Failed password for root from 64.219.97.248 port 50830 ssh2 PAM_unix[7427]: authentication failure; (uid=0) -> root for ssh service sshd[7425]: Failed password for root from 64.219.97.248 port 50338 ssh2 sshd[7419]: Failed password for root from 64.219.97.248 port 49945 ssh2 sshd[7417): Failed password for root from 64.219.97.248 port 49584 ssh2 PAM_unix[7417]: authentication failure, (uid=0) •> root for ssh service sshd[7415]: Failed password for root from 64.219.97.248 port 49062 ssh2 sshd[7409]: Failed password for root from 64.219.97.248 port 48627 ssh2
END OF NOTIFICATION
Fig. 3. OSSEC alert-10
-
B. Result Analysis of NIDS – SNORT Tool
Snort is an open source and one of the most efficient tools of NIDS, most advantageous part is, it can be place anywhere in the System/Network according to type of output desired. In our experiment we made a network of 4 computers connected via LAN and exchange of ARP, RARP packets was done [11]. We used Snort in the sniffing mode, and were able to detect and examine all the packets which were transferred between the computers. We ran snort from 1 machine, we is sufficient to monitor all the packets of the network. Snort is an open source and one of the most efficient tools of NIDS [12], most advantageous part is, it can be place anywhere in the Sys-tem/Network according to type of output desired. In our experiment we made a network of 4 computers connected via LAN and exchange of ARP, RARP packets was done. We used Snort in the sniffing mode, and were able to detect and examine all the packets which were transferred between the computers. We ran snort from 1 machine, which is sufficient to monitor all the packets of the network.
In our experiment while sniffing the traffic via snort there at times packets were lost, or were in outstanding category. We have developed a pie chart on our observations about the packets lost and passed and which were threat for the system at a particular instance.
The packets which were dropped were basically stopped by the snort, as they seem to be threat to the system. While Analyzed section shows the no of packets which were tested by the snort, and received section showed the no of packets received by the network, so we can easily check for the efficiency of the software by comparing these two results and checking whether the software has missed any packets and has not analyzed it.
Packet Hire Totals: Received: Analyzed: Dropped:
Outstanding:
4ЭЗ
492 (99.797Z)
0 (O.OOOZ)
1 (0.203Z)
Breakdown ETH;
ETHdisc: VLAN: IPV6:
IP6 EXT: iPCopts: IPSdisc:
IP4: lP4disc: tcp 6: UDP 6: 1CMP6: ichp-ip; TCP: udp: ICMP; TCPdisc: UDPdisc: ICHPdis: FRAG: FRAG 6: ARP: EAPOL: ethloop: ipx; other: DISCARD:
InvChkSun;
Upconvt: Up Fail:
S5 G 1: S5 G 2: Total:
by protocol 492
0 0
0 0
(includes rebuilt packets): (10O.0O0Z)
(O.OOOZ)
(O.OOOZ)
(O.OOOZ)
(O.OOOZ)
(O.OOOZ)
(O.OOOZ)
(91.O57Z)
(O.OOOZ)
(O.OOOZ)
(O.OOOZ)
(O.OOOZ)
(o.oooz)
(O.OOOZ)
(9O.244Z)
(0.813Z)
(O.OOOZ)
(O.OOOZ)
(o.oooz)
(O.OOOZ)
(O.OOOZ)
(3.G59Z)
(O.OOOZ)
(O.OOOZ)
(O.OOOZ)
(5.285Z)
(O.OOOZ)
(O.OOOZ)
(O.OOOZ)
(O.OOOZ)
(O.OOOZ)
(O.OOOZ)
Action Stats:
ALERTS: 435
LOGGED: 435
PASSED: 0
Fig. 4. Snort Packet sniffer mode
According to these results and threats, snort generates the alerts by changing the color of the details to the red [13].
This chart shows the situation of 50 packets, we can expect the similar situation for any amount of packets of the same type and in same environment.
Packets sniffed
о
-
■ Packets Analyzed (50%)
-
■ packets
Dropped (2%)
-
■ Outstanding packets (3%)
-
■ Filtered (45%)
Fig. 5. Snort Result analysis
OSSEC HIDS
Д Why is this message in Spam? It's similar to messages that were detected by our sf
OSSEC HIDS Notification
2013 Nov 16 02:11:00
Received From utxjntu->/var/log/sysk>g
Rule 5104 fired (level 8) •> "Interface entered in promiscuous(sniffing) mode ’
Portion of the log(s):
Nov 18 02 10 58 ubuntu kernel [ 793 956109] device ethO entered promiscuous mode
-END OF NOTIFICATION
Fig. 6. OSSEC response to Snort.
The best part when both the tools are working together in the system they can detect each other presence, as OS-SEC tool notify about the snort in the alert mail.
It reads as “Sniffing Mode activated”. This is because we started Snort in sniffer mode with a command “snort – v” with this command we are able to run the sniffing mode, which detects and reads the characteristics of each and every packet passing in the network (in our case LAN).
When the mode is stopped it shows the summary of the transactions with the total no of packets transferred and also showing the count of the protocols of the packets in which they are transferred and many other detail. (Fig.4).
-
V. Conclusion and Future Work
Using IDS, is totally dependent on the requirements and results needed out of it. IDS is very flexible, and can be used for various purposes or can also be used in either HIDS or NIDS mode[15] Also after defining the type of results need to be obtained, its placement can be finalized in case of NIDS. It works totally on what are the priorities of a company or an individual is. We can use IDS to tackle with intruders in standalone or multi-network ma-chines/systems. On the other hand Logs can help us compare or create new set of records/rules for future reference and measuring system efficiency.
On a lighter note: IDS can be compared with a small kid, who creates fuss (alerts) when needed attention (attacks).
Table 1. Comparing characteristics of HIDS and NIDS
|
ATTRIBUTES |
HIDS- OSSEC |
NIDS- SNORT |
|
( Result analysis) |
||
|
Placement |
Follow Host-Client, and always handled via Host. |
It can be place anywhere in the network, according to type of results required. |
|
Monitoring |
Does not inspect traffic when it is not directed to the host. (Majorly focus on internal system settings and logs.) |
It acts as a proper sniffer, and monitors all the packets of the network. |
|
E-mail alerts |
OSSEC does inform about the alerts via email. |
Snort does not have email alert feature. |
|
Types of Alerts |
In OSSEC there are 15 alert levels defined for the attacks, to make aware user about the attacks. |
Snort has a huge set of Snort-Rules which contains signatures and act as medium to compare the packets; It is very vast and dynamic in nature. |
|
Versatility [14] [15] |
HIDS more versatile. |
NIDS are less versatile. |
|
Logging capability |
There are proper commands and function to log the results on cd-rom or HDD. |
NIDS out of 3 modes we observed, one is to Log the records while sniffing. |
|
Protection in case of No LAN |
HIDS performs to its full efficiency, without any errors. |
NIDS cannot work, if the LAN environment is not available. |
|
Significant specialist Knowledge |
HIDS does not require any specific knowledge, and can be deployed with ease. |
NIDS does require extra efforts to gain that specific knowledge so as to deploy. |
|
Intrusion Prevention System |
HIDS does not deal with IPS. |
NIDS does have IPS as one of its process. |
After studying the characteristics of both NIDS and HIDS, we are in position to compute a single system comprising of characteristics of both the types and can lead to efficient results. Here Computation Intelligence come into action, CI include genetic algorithm and Fuzzy logic, which sets the foundation of the concept. Based on these algorithms we shall be implementing our tool on certain developing language code.
Acknowledgement
This research paper is made possible through the help and support from everyone, including: Friends, technicians, professors, and in the essence of all sentient beings. Please allow me to dedicate acknowledgement of my gratitude towards the author of the Manuscript Template, for providing such easy instructions for the paper.
I would like to mention the contribution of the professors and lab assistants in providing us the equipments to carry forward our research in terms of Systems, modems, networks and etc.
The product of the research would not be possible without all of them.
References Analysis of Host-Based and Network-Based Intrusion Detection System
- Pieter de Boer, Martin Pels, "Host-based Intrusion Detec-tion Systems", Revision 1.10 – 2005, p: 5-7.
- Corry Janssen, "Network-Based Intrusion Detection Sys-tem (NIDS)" , 12941- techopedia, p: 1.
- V. Jaiganesh, S. Mangayarkarasi, Dr. P. Sumathi, Intrusion Detection Systems: A Survey and Analysis of Classification Techniques", International Journal of Advanced Research in Computer and Communication Engineering Vol. 2, Issue 4, April 2013, p: 2.
- Bilal Maqbool Beigh, Prof. M.A. Peer, " IntrusionDetec-tion and Prevention System: Classification and Quick Re-view", ARPN Journal of Science and Technology 2012, p: 5.
- James Cannady, Jay Harrell, "A Comparative Analysis of Current Intrusion Detection Techn-ologies", p: 6.
- Anton Chuvakin, Vladislav V. Myasnyankin, “Complete Snort-based IDS Architec-ture", Part One, 2002, p:3-5
- Joseph Dries, An Introduction to snort: A Light-weight Intrusion Detection System, 2001, p:8
- Ossec Manual (OSSEC official website), syscheck, p: 2.
- Ossec Manual (OSSEC official website), Database-Output, p: 1.
- Ossec Manual (OSSEC official website), Pre-lude Output, p: 1.
- Kang Hong, Zhang Jiangang, “An Improved Snort Intru-sion Detection System Based on Self-Similar Traffic mode”, Computer Network and Multimedia Technology, 2009. CNMT 2009. International Symposium on, 18-20 Jan. 2009, doi: 10.1109, p: 1 – 4.
- Zhimin Zhou, Chen Zhongwen, Zhou Tiecheng, Guan Xiaohui, “ The Study On Network Intrusion Detection Sys-tem of Snort”, Networking and Digital Society (ICNDS), 2010 2nd International Conference on (Volume:2), 30-31, May 2010, doi: 10.1109, p: 194-196.
- Chris Murphy, David Shinberg, “An Analysis of the snort Data Acquisition Modules”, SANS Institute InfoSec Read-ing Room 34027, 2012, p: 15.
- Ricky M.Magalhaes, “ Host-Based IDS vs Network-Based IDS (Part1)”, 2003, p: 2.
- Bhavani Sunke, thesis: “Research and Analysis of Network Intrusion Detection System”, 2008, p: 25-26.
