Using Virtual Security Lab in Teaching Cryptography

Author: Salma M. Gaffer, Daniyal M. Alghazzawi
Journal: International Journal of Modern Education and Computer Science (IJMECS) @ijmecs
Article in issue: 1 vol.4, 2012.
Free access
Teaching Information Security for undergraduate students requires a safe hand-on environment for practicing. This paper focuses on using a virtual lab for two modules in cryptography concepts. At the end, a survey was conducted on a group of students at the Information Systems Department at the King Abdulaziz University to measure the performance of the students’ outcomes in the lab comparing with other students from a previous semester. The result of the survey shows a significant feedback on the system.
Information Security, cryptography, Virtual lab
Short address: https://sciup.org/15010377
IDR: 15010377
Text of the scientific article Using Virtual Security Lab in Teaching Cryptography
Published Online February 2012 in MECS
One challenge in the Information Security education is its interdisciplinary and practical nature. Students need to have the basic knowledge and skills of a programming language to understand many of the information security topics. The students also need to actually practice to learn how to prevent, identify and resolve Information Security breaches, but limited university resources and few local information security domain experts sometimes limit the scope and scale of projects that students could practice in lab environments. If such labs are not designed properly, students could also cause network security problems when they explore security vulnerabilities of university or company public web sites [4].
Traditional techniques of teaching (i.e. lectures or literature) have turned out to be not suitable for information security training, because the trainee cannot apply the principles from the academic approach to a realistic environment within the class. In information security training, gaining practical experience through exercises is indispensable for consolidating the knowledge. Precisely the allocation of an environment for these practical exercises poses a challenge for research and development. That is, because students need privileged access rights (root/administrator account) on the training system to perform most of the perceivable security exercises. With these privileges, students could easily destroy a training system or even use it for unintended, illegal attacks on other hosts within the campus network or on the Internet. The classical approach requires a dedicated computer lab for information security training. Such labs are exposed to a number of drawbacks: they are immobile, expensive to purchase and maintain and must be isolated from all other networks on the site. Of course, students are not allowed to have Internet access on the lab computers. Hands-on exercises on information security topics even demand to provide more than one machine to each student, which have to be interconnected.
Teleteaching for security education mostly consists of multimedia courseware or demonstration software, which do not offer real practical exercises. In simulation systems users do have a kind of hands-on experience, but a simulator doesn't behave like a realistic environment and the simulation of complex systems is very difficult – especially when it comes to interacting hosts on a network [7].
This paper shares our experience of using two portable lab modules to support in conducting hands-on information security laboratory exercises. The lab modules are based on the NSF SWEET (Secure WEb dEvelopment Teaching) project [6] and Department of Defense Information SAssurance Scholarship project. The SWEET project builds on a different approach for a virtual security lab system (explained in detail in section 3). Furthermore, we will describe a set of exercise scenarios to illustrate the capabilities of the SWEET training environment. SWEET utilizes virtualization technology for laboratory exercises. The purpose of this project is to enhance the learning experience of computing students through standardized teaching modules and environment in secure development platform. Two lab modules were presented to students beside the previous lab syllabus and a survey was conducted to compare student’s response.
The paper is organized as follows; section 2 presents computer virtualization, and selection of computer lab virtualization technologies is discussed in section 3. While section 4 presents the selected security lab modules in details, and the Survey Discussion is described in section 5. At the end, section 6 includes the conclusion and future recommendations.
-
II. Computer virtualization
The virtualization of a computer means to run emulator software, like VMware Player [1] or Microsoft Virtual PC [2], on a computer (host computer or physical computer) to emulate another desired computer (virtual computer). Virtual computer is implemented by a folder of 2 to 8 GB files, and the emulator runs these files to emulate the virtual computer as a computer window or the complete computer desktop. To the users a virtual computer is just the same as the physical one. The virtual and host computers can have different operating systems and share data and Internet access. The users can work on multiple virtual computers and the host computer at the same time. The users can install new applications on the virtual computer as on a physical one. A virtual computer can run most operating systems including all versions of Windows and Linux. There are two virtualization technologies: (1) server-side virtualization for running the virtual computers on a remote server computer, and (2) client-side virtualization for running the virtual computers on users’ own computers. While company/university IT infrastructure servers can use the server-side virtualization to improve resource utilization. Client-side virtualization greatly reduces the pressure on the servers and network bandwidth and take advantage of faculties and students PCs’ excessive computing power already available today. In the recent years we have studied many PC/lab outsourcing services based on server-side virtualization, including those based on IBM mainframes, and concluded that they all have recurring high costs or very limited flexibility and resources for the users (such remote virtual computers are at least ten times slower than a today’s $400 PC in supporting interactive lab sessions, usually with no Internet access and less than one GB of disk space).The main advantages of client-side computer virtualization for university computer labs include
-
• There is no need of investment for a university to adopt virtual computing labs, and there are no recurring costs.
-
• There is no significant cost for distributing the virtual computers and lab modules to the faculty or students. The virtual computer’s implementation folder can be distributed through web downloading, USB flash disks, or DVD disks. Typically a student can keep his/her virtual computers for different courses on a single thumb-size USB flash disk.
-
• If a person knows how to use a physical computer, he/she knows how to use a virtual computer. There is minimal learning curve for the users.
-
• New software can be installed on a virtual computer. If the user messes up a virtual computer, he/she just gets a fresh copy of the virtual computer’s implementation folder.
-
• Any computer, no matter whether it runs Windows, Linux, or Mac OS, can install a free
(around $70 for Mac OS) computer emulator and run the virtual computers.
-
• Therefore the students can work on a course lab anywhere. The course work can be started on one computer, and later resumed and completed on another. Therefore we could support the concepts of “coursework can be conducted anywhere on any computer” and “portable labs”.
-
• If an online student has difficulties in the hands-on course work, the instructor can easily reproduce the problems and help resolve the problems since they are using the same working environment or virtual computer.
-
• The University has less pressure in updating its lab PCs and it needs less staff to maintain them. Any PC that has 1-4 GB memory and 100 GB disk space can support virtual computers in the coming years, and all university PCs of a specific model can share a single configuration image. If a PC has problems, just get it a fresh copy of the virtual computer’s implementation folder (assuming important data are on university network disks or owner’s disks) [7].
-
III . Selection of virtualization technology
After a survey on several existing virtual lab modules for Security education, we adapted SWEET (Secure WEb dEvelopment Teaching) [3], which is one of the secure web development for teaching modules in security. SWEET features eight teaching modules, six project modules, and a virtualized web development platform that allows instructors to conduct hands-on laboratory exercises [8]. For SWEET security virtual labs, we choose VMware virtualization over Microsoft Virtual PC because the former can support virtual machines running any operating system including all flavors of Linux. The purpose of the SEET project is to enhance the learning experience of computing students through standardized teaching modules and environment in secure web development, to create a portable teaching laboratory and to evaluate the effectiveness of the teaching tool in improving students' learning experiences. It aims to train a new generation of computing professionals who would understand and be able to solve security problems occurred in web development. It is expected to attract more undergraduate students studying in computing by providing a new, interesting and innovative teaching tool in secure web development. In addition to the previous motioned features; we selected this module because it covers basic concepts in information security, such as, private/public key encryption, hash function, digital signature and digital certificates. These topics are covered in our selected course (CPIS312 - Information Security)
-
IV .Security lab module in cryptography
The virtualized web development platform in SWEET covers fundamental concepts of symmetric secret key ciphers, public key ciphers, hash functions, digital signatures and digital certificates. We have examined the following lab objectives:
-
• Learn and practice how to use MD5 and SHA1 to generate hash codes of strings or large files, and verify whether a downloaded file is valid;
-
• Learn and practice how to use GPG to generate public/private key pairs and certificates, to distribute the certificate with public key, and to encrypt/decrypt a document with the public/private key.
GPG (Pretty Good Privacy) is a computer program that provides cryptographic privacy and authentication. PGP supports public/private key pairs to implement secure data communications between communicating parties. GPG (GNU Privacy Guard) is the open-source version of PGP.
The following is a sample of practicing hashing files with MD5 and SHA-1 and practicing PGP concepts with GPG on the Ubuntu VM.
-
A. Hashing Files with MD5 and SHA-1
While you could use public/private key pairs to authenticate the author of a message and validate the contents of the message, it would be slow if the message is long. Digital signatures are designed to make author and contents validation more efficient. When you digitally sign a document, you normally (not necessary) keep the document in plain form so everyone could read it, and you append a digital signature, which is a small piece of data, to the end of the plain document so the receiver could validate the author and validity of the public document if necessary.
You first need to compress the variable-length document into a short fixed-length string (popularly called fingerprint, digest or hash code ). You use a hash function to do so. A hash function reads a long document, and produces a fixed-length short string, called fingerprint ( hash code or digest ), so that each bit of the fingerprint depends on as many bits of the input document as possible. Even though not possible in theory, in practice the hash function establishes a one-to-one mapping between the plain documents and the fingerprints with high probability: if someone modifies the plain document, its fingerprint would differ. The application of a hash function on the same document always generates the same fingerprint. SHA-1 and MD5 are both examples of hash functions. While MD5 uses 128 bits for fingerprints, SHA-1 uses 160 bits for fingerprints so it is less likely to produce the same fingerprint from two different files.
In this sample lab, the student will learn how to use SHA1 and MD5 to generate fingerprints (sums) of files so you could be sure whether the downloaded large files have been compromised. There are also hash functions SHA224, SHA256, SHA384 and SHA512, which are all variants of SHA1 and use more bits for fingerprints to reduce the chance of fingerprint collision (different files have the same fingerprint)[3].
-
1) Start a terminal window in home folder ~ with menu item “Applications/accessories/Terminal”.
-
2) Create the first file “file1.txt” by typing $ cat > file1.txt [Enter] This is the first file [Enter] This is line 2 [Enter] [Ctr-d]
-
3) Create the second file “file2.txt” by typing $ cat > file2.txt [Enter] This is the second file[Enter] This is line 2 [Enter] [Ctr-d]
-
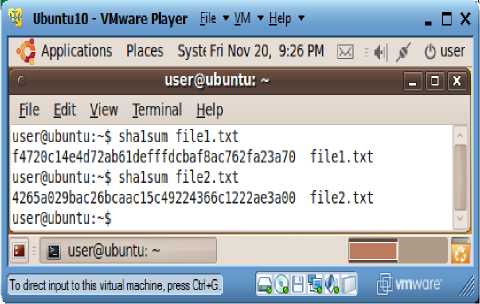
4) Run “sha1sum file1.txt” and “sha1sum file2.txt” to generate the hash codes (sums) for the two files; each execution generates a line of two entries. The second entry is a file name, and the first entry is the hash code of the contents of the file whose name is the second entry. The hash codes are printed in hexadecimal as shown in Fig. 1.
-
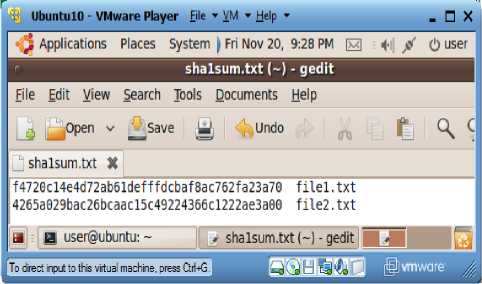
5) Run “gedit sha1sum.txt” to create a new text file “sha1sum.txt”, and copy the two output lines of the last step into this file as shown in Fig. 2.
-
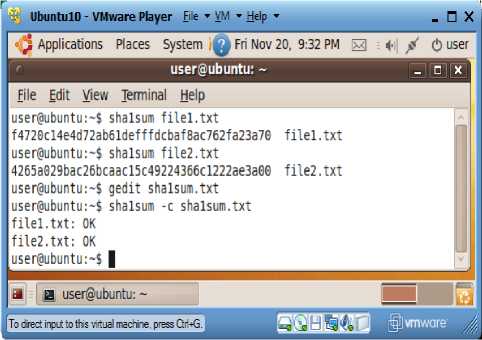
6) Run “sha1sum -c sha1sum.txt”. In this case program “sha1sum” will read file “sha1sum.txt”. For each line in this file, it will check whether the
SHA1 hash code generated for the contents of the second entry (file) is the same as the first entry (SHA1 hash code calculated beforehand). If they match, the program will print out OK for the file as shown in Fig. 3.
-
7) Now redo steps 4, 5 and 6 but replacing command “sha1sum” with “md5sum” and replacing file name “sha1sum.txt” with “md5sum.txt”. You will notice that the MD5 hash codes are shorter and they serve the same purpose of file contents validation as shown in Fig. 4.
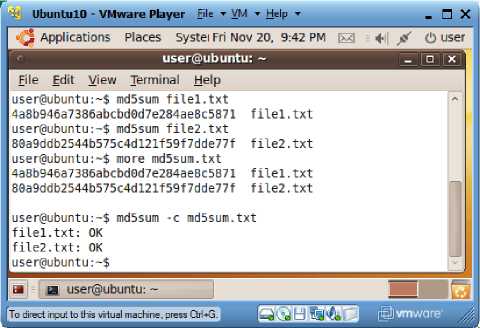
Figure 4. Hashing Files with MD5
When you donload large fles, like ISO disk image files, you should download their corresponding MD5Sum or SHA1 SUM files so you could check wether the downloaded files are valid or corrupted.
-
B. Public/Private Key Creation and
Encryption/Decryption
Secure communications on the Internet or web is the foundation of network security and web security. Cryptography is the practice and study of how to hide information from potential enemies, hackers or the public. The sender encrypts a message with a small piece of secret information (key), and then sends the encrypted message to the receiver. The receiver decrypts the encrypted message with a small piece of secret information (a key that is same or different from the key used by the sender) and recovers the original message. People who do not have the right keys would not be able to read the message even if they steal a copy of the encrypted version.
There are two categories of cryptographic systems: single key symmetric ciphers or dual-key public key ciphers. With the second category, public key ciphers, a pair of public key and private key will be generated together. You can use either of the two keys to encrypt the plain data, and then use the other key to decrypt the encrypted data. For example you can encrypt data with the public key and use the private key to decrypt the data. RSA and Diffie-Hellman are the two most widely used public key algorithms
Typically, the key owner will keep the private key and distribute the corresponding public key to his/her potential communication partners. There are two typical application scenarios:
-
1) Author and contents validation. If the key owner needs to distribute a message to his friends and assure them the message is really originated from the owner without modification by any third parties, the owner would encrypt the message with the private key. If the receivers could decrypt the message with this owner ' s public key, they know that the message is really sent by that owner and the message has not been modified.
-
2) Many-to-one private messages. If a friend needs to send a private message to Person A, he could encrypt his message with Person A 's public key and then send the resulting message to Person A, and only Person A, the owner of the right private key, could decrypt the private message.
Each computer maintains the public/private keys of the computer user in a file called key store, and the owner needs to set up passwords to limit the access to the key store.
In the following lab guidance, we used the names Alice and Bob to refer to the two virtual users. The names Alice and Bob are commonly used placeholders for archetypal characters in fields such as cryptography and physics. The names are used for convenience, since explanations such as "Person A wants to send a message to person B" can be difficult to follow in complex systems involving many steps. Following the alphabet, the specific names have evolved into common parlance within these fields helping technical topics to be explained in a more understandable fashion. In cryptography and computer security, there are a number of widely-used names for the participants in discussions and presentations about various protocols [9]. The following lab guidance is provided to our students to help them create a pair key (Public key and Private Key) and use them for encrypting and decrypting:
-
1) Create Linux Accounts for Alice and Bob
-
a) Launch your Ubuntu-Master Install VM, and start a terminal window.
-
b) Run command “sudo adduser alice” to create a Linux account for Alice. Use 123456 as password.
-
c) Run command “sudo adduser Bob” to create a Linux account for Bob. Use 123456 as password.
-
d) Run command “sudo visudo” to launch file “/etc/sudoers.tmp” in a text editor, insert the following two lines at the end of the file, and then use Crtl+O to write out the revised contents, and use Ctrl+X to exit the editor. This step will enable Alice and Bob to use “sudo”.
-
alice ALL=(ALL) NOPASSWD: ALL Bob ALL=(ALL) NOPASSWD: ALL Run as Alice and Bob in two terminal windows a) In the terminal window, run “sudo login”, and then login as Alice.
-
b) Start a new terminal window, run “sudo login”, and then login as Bob.
Generate keys for Alice
-
a) In Alice's terminal window, run “gpg --genkey” to generate her public and private keys. Enter “DSA and Elgamal” for key kind, 2048 for key size, “key does not expire” for key expiration date, “Alice” for real name, alice@pace.edu for email address, “Alice’s keys” as comment, and “Alice’s passphrase” for passphrase. You may need to type over 284 random keys to generate enough entropy so the keys could be created.
Generate keys for Bob
-
a) In Bob's terminal window, run “gpg --genkey” to generate his public and private keys. Enter “DSA and Elgamal” for key kind, 2048 for key size, “key does not expire” for key expiration date, “Michael” for real name, Bob@pace.edu for email address, “Bob's keys” as comment, and “Bob's passphrase” for passphrase. You may need to type over 284 random keys to generate enough entropy so the keys could be created.
Export Alice's public key to Bob
-
a) In Alice's terminal window, run “gpg --armor --output alice-pk --export alice@pace.edu” to dump Alice's public key in file “alice-pk”. You can run “more alice-pk” to review the public key.
-
b) Run “sudo cp alice-pk /home/Bob” to copy Alice's public key file “alice-pk” to Bob's home folder.
-
c) In Bob's terminal window, verify the existence of file “/home/Bob/alice-pk” by running “ls” in Bob's home folder ~ (/home/Bob).
-
d) In the same Bob's terminal window, run “gpg --import alice-pk” to import Alice's public key into Bob's key store.
-
e) In the same Bob's terminal window, run “gpg --edit-key alice@pace.edu” to enter the
editing session for Alice's public key. Type sub-command “fpr” to review the fingerprint of Alice's public key. Type sub-command “sign” to sign this key with Bob's key. You will be asked to enter Bob's passphrase, which is “Bob's passphrase”. Type sub-command “check” to review who is on the signature list of Alice's public key, and we will see Alice (self-signature) and Bob on the list to confirm the validity of the key. You type subcommand “quit” to exit the editing session, and confirm to save the changes.
-
6) Create and encrypt a message
-
a) In Bob's terminal window, run “cat > msg-to-alice” followed by the ENTER key, type “Alice's secret message”, and then type key combination Ctrl+D to close the file. You just created a new text file “msg-to-alice” with contents “Alice's secret message”.
-
b) In Bob's terminal window, run “gpg -recipient alice@pace.edu --output secret-to-alice --encrypt msg-to-alice” to generate a new file “secret-to-alice” containing the encrypted version file “msg-to-alice”.
-
c) In Bob's terminal window, run “more secret-to-alice” to review the encrypted version of the message.
-
d) In Bob's terminal window, run “sudo cp secret-to-alice /home/alice” to copy file “secret-to-alice” to Alice's home folder “/home/alice”.
-
e) In Alice's terminal window, run “ls” in Alice's home folder ~ (/home/alice) to verify the existence of file “secret-to-alice”.
-
7) Decrypt the message
-
a) In Alice's terminal window, run command “gpg --output msg-from-Bob --decrypt secret-to-alice” to decrypt the contents of file “secret-to-alice” and save the result in a new file “msg-from-Bob”.
-
b) In Alice's terminal window, run “more msg-from-Bob” to review the decrypted message
-
c) From Bob.
-
V. Survey discussion
The proposed new teaching method for the two cryptography modules using SWEET was tested on a group of 28 undergraduate students for the course CPIS312-Information Security in the Information Systems department at Faculty of Computing and Information Technology in King Abdulaziz University. A survey of 6 questions was conducted at the end of the semester to measure the effectiveness of the new tool on the students. The survey included questions to elicit their feedback on the lecture materials, laboratory exercises, the mapping between the lecture and the lab and the overall impact of these modules on their learning. Our results show that the students had invested significant amount of time (2-4 hours per week on average) in completing hands-on exercises. However, they generally agreed that the course materials were planned well (69%),while 100% of students found that the new teaching modules had enhanced their learning capabilities and 100% of the students are totally with adopting the new teaching modules. The lab modules had drawn their interests with a percentage of 100%. The Survey questions along with their answers are listed in Table 1, and the results of the survey are illustrated in Fig. 5.
Table 1. Survey Questions and Answers
|
# |
Question |
Answers |
|
1 |
To what extent do new teaching modules & portable lab (Virtual Security Lab) enhance student’s learning? |
a) Good Enough b) Poor |
|
2 |
Are you with or against adapting the new teaching modules for next semesters? |
a) Totally With b) Against |
|
3 |
To what Extent do you believe that the new Teaching modules are enough for learning targeted security concepts? |
a) Entirely Enough b) Should Be mixed with previous semester teaching modules |
|
4 |
How would you assess the new teaching modules (Virtual Security Lab)? |
Useful in teaching
Useful in teaching |
|
5 |
How would you assess the previous teaching modules (Java Programs)? |
Useful in teaching c) Interesting |
|
6 |
To what extent is pervious learning, teaching and laboratory material was well developed? |
|
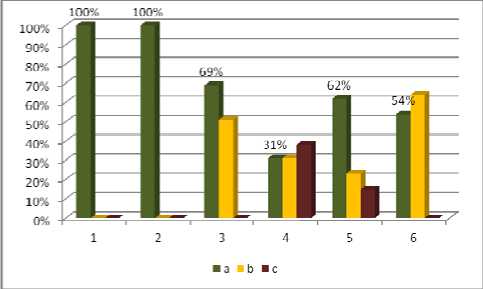
Figure 5. The Results of the Survey
-
VI. Conclusion
This paper shares our experience of using of a Virtual Security lab module in teaching Information Security lab in the Information Systems department at King Abdulaziz University. The benefit of using the mentioned lab modules is threefold: First, none of the damaging or questionable traffic was generated on any production network, Virtual Machines allow for the creation of simple files or groups of files that can be distributed with all the configuration necessary to demonstrate topics in a way that does not negatively impact the device or the network the device is running on [5]. Second, all of the labs could be run not just from the lab, but from a properly configured platform in any location. Third, the virtual lab is, indeed, more interesting way of practicing for students.
References Using Virtual Security Lab in Teaching Cryptography
- VMware Inc., “VMware Player”, available http://www.vmware.com/ products/player.
- Microsoft Inc., “Microsoft Virtual PC”, available http://www.microsoft.com/windows/downloads/virtualpc
- L. Tao, “Introduction to Cryptography”, available http://csis.pace.edu/lixin/download/lab-cryptography.pdf, 2010.
- Lixin Tao, Li-Chiou Chen, and Chienting Lin,Virtual Open-Source Labs for Web Security Education, Proceedings of the World Congress on Engineering and Computer Science 2010 Vol I
- Harry Bulbrook, Using Virtual Machines to provide a secure Teaching Lab environment
- L. Chen, “Secure Web Development Teaching Modules”, SWEET project web site, available http://csis.pace.edu/~lchen/sweet.
- Christian Willems, Orestis Tringides, Christoph Meinel, Practical IT Security Education with Tele-Lab
- http://csis.pace.edu/~lchen/sweet/
- C.H. Lindsey, Regulation of Investigatory Powers Bill: Some Scenarios, 2000
